04 November 2010

Bison Girl Debutes on Etsy

Big announcement: Bison Girl has an Etsy store!
If you are not familiar with Etsy, it is a marketplace for homemade goods, materials, and vintage/antique items. In short, it is way cool.

So what is Bison Girl selling on Etsy?!
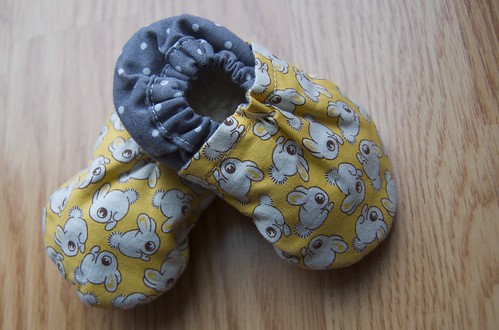
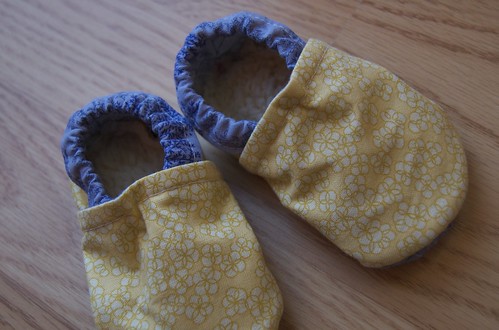
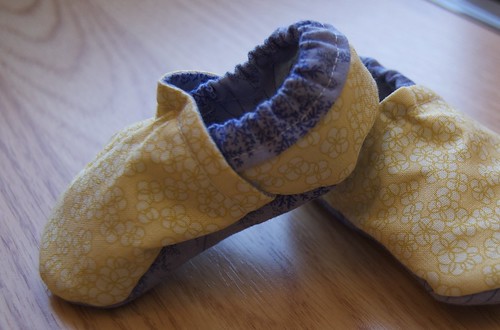
Bison Booties, but of course.

DSC_8813
I made my first pair of baby booties when I was pregnant with our daughter. At the time I had no clue how much wear she'd get out of them. Luckily, I made two pairs ahead of time. From birth to today, she wears her booties during every outing and most days she wears them at home too. We have hard floors, so without her booties, her toes get chilled.

Fast forward to today ... I have modified the pattern to my liking. I have also up-sized it for babies 6 months old and beyond (because I could not imagine a world without these perfect little booties). I can't keep all these great booties for myself. I have to let the world in on this secret.

DSC_8805
See them for yourself: Bison Girl Etsy Store

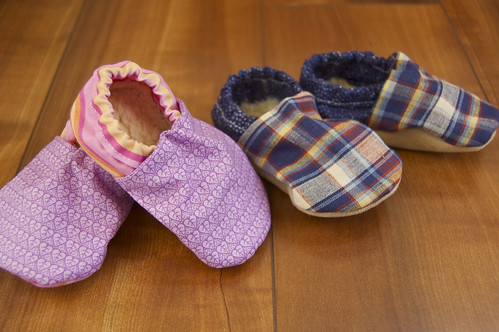
I call them Bison Booties
They are fully lined and have a covered elastic back, so they comfortably stay on active little feet. On the inside, baby's feet rest on cuddly faux sherpa, which does a great job keeping the toes toasty warm. As an added bonus, the booties are considered to be "soft shoes" - which are best for infant/toddler foot development and balance. As for style, I am chipping away at my stash of quilt fabric, so each pair of booties is made of high quality, designer material.

DSC_8826
Currently I make two sizes (but I will expand this soon).
Since the booties are made individually by hand, the sizes my vary a bit. For the best sizing, measure the baby's foot and add 1/4 inch. When in doubt, order up.

The 0-6 month size would make a great new baby gift, especially for infants born in the fall/winter. And I have booties for boys and girls!

DSC_8854
Most questions should be answered in my store, but if you have any questions, just leave a comment under this post. Happy shopping :)

30 October 2010

Pick A Card, Any Card

Now showing: Bison Girl Design business cards!

DSC_8736
This is the front/back design.
I have over 1,000 of them... do you think our trick-or-treaters would like one with their candy?

Bison Booties

This week I started unpacking my sewing studio.
I couldn't help but immediately dive right back into sewing.

These Bison Booties are for a special baby boy and girl.
DSC_8738
My daughter wears her shoes like this everyday. They are the only things that stay on her busy feet. I am thinking about pursuing the idea of making and selling these booties, but I need to perfect the pattern and design first. I'm close ... really close. Stay tuned.

27 October 2010

2010 Special: Custom Photo Cards

I don't know about you, but from where I sit, it is beginning to look a lot like Christmas.

You what that means: Christmas card season!
Do you want an extra cool photo card this year?

Basic CMYK

Bison Girl is happy to announce custom photo cards at the 2010 price of $25 per design.

Step 1: You supply the photo, desired text, and artistic direction (if you have a preference)
Step 2: I design a fun and festive card that spotlights your photo(s)
Step 3: You receive a high resolution digital .jpg file that you can have printed anywhere and/or post to Facebook.

Photo cards are normally 4x8, 5x7, 6x7, or 6x8 inches, but I can design to any size.

Sample Cost:
$25.00 Bison Girl Custom Card Design
$14.50 Sam's Club charge for 50 4x8 photo cards, including envelopes
That adds up to only $39.50 for 50 custom cards!

Fine print: You absolutely must own the rights to the photo(s) you supply. This means that you personally took them or you have written permission from the professional photographer. Photo retouching (acne, red eye, color correction, special effects) can be added starting at $15 per photo. Prices apply to single-sided photo cards ordered before December 31, 2010.

This special is good for custom engagement/birth announcement/New Year/Thanksgiving (or just about anything) cards too!

Check out a couple of my past card designs in my portfolio.

---

To get started, contact me.
Thanks to the wonderful world of technology, you need not live in Bismarck, or even North Dakota to take part :)

07 October 2010

Ugly Logo Blog

So last week it was bad photoshop. Today I bring you bad logos: Your Logo Makes Me Barf.

I don't even have words to describe how fantastic this blog is and how totally awful their spotlighted logos are. Sadly, there are way too many bad logos out there to keep blogs like this plenty full of content.

Case in point.
Have you seen the new Gap logo?


You know, GAP. Like the store. Yeah that one.
yikes.
no.
YIKES.

Anyway, check out the blog for more gems.

05 October 2010

Logofest at Bison Girl Design

Wowie zowie.
I've been a busy lady lately. All fun of course, especially the new logos I've been designing for fantastic clients friends.

Designing a logo usually requires many drafts and revisions. It's quite fun to watch a logo come to life and eventually become the final logo.

Here are a few of the logos (and drafts) I've designed recently. Thank you to everyone I've worked with so far, it has been a lot of fun. I hope you're all lovin' your new logos!

As always, I'd be honored and excited to work with you on a logo (or other design work) – contact me for more information.

- - -

Bismarck-Mandan Moms Group
If you are a mom of a youngin' in the Bismarck-Mandan area and want to join our fun, casual group, let me know.
Print
Tips for Tiaras by Brandi
Pageant coaching from Brandi. If you are interested in her services let me know and I'll put you in contact with her.
Tips for Tiaras Logos 2
Tips for Tiaras Logo Final

Skid Pro
I got to get to know my inner Tomboy for this one! This logo is for a new company that sells Bobcat Skid Steer Attachments.
Basic CMYK
Basic CMYK
skid pro 2

Delicious Designs
A new custom embroidery and applique business, primarily for baby and child items/apparel.
Delicious Designs Logo
Delicious Designs Logo 1

30 September 2010

Photoshop gone wrong. Very wrong

I've got a big day of Photoshopping ahead of me.

The object of the game today is to make sure none of my projects find their way onto this blog: Photoshop Disasters. (warning: graphic)

Here is a sample of the site:
Screen shot 2010-09-30 at 8.12
Ow!!! My pinky! Where has it gone?!

- - -
Moral of the story: we are artists, not surgeons. Let's keep it that way.
Thank you to my high school yearbook (and fellow Apple geek) friend Hilary for sharing this.

04 August 2010

Naming Inspiration

So, you say that you're starting a business/blog/website and you need a name?
Want something more creative than: Photography by Sam, or Joe's Plumbing?

Bison Girl can help.

A few tips to get you started:
  1. Short. Short. Short. Both with your name and with your URL. Nobody should try to remember www.supercoolnewhairstylistonmainstreet.net when they ask for your website.
  2. Unique and special to you. No, I'm not recommending naming it Suzy's Salon just because your name is Suzy. I recommend that your selected name be something that you are passionate about, and that has an emotional link to you. The words should also convey the feelings of your new venture: bold, quiet, energetic, comfortable, motivating ...
Want more tips and inspiration?
I'd be happy to brainstorm with you, recommend business names, and/or help you select one.
E-mail me for more information and rates: hager.erica@gmail.com

21 July 2010

5 ... 4 ... 3 ... 2 ... 1 ...


Lift Off!
I just launched www.bisongirl.com


Go take a look and let me know what you think!

12 July 2010

Back and Better Than Ever

I'm back!
After nearly five months of blogging hiatus, I'm officially back.

Since my last blog I have been a bit busy. Here is a rundown:
1. sold our house
2. managed the building of our new house
3. had a beautiful baby (and my life is forever better because of her)
4. moved most of our belongings into storage
5. moved into a temporary apartment
6. quit my job
7. started my own freelance graphic design business

phew.
It has been a wonderful five months.

Now, a small task for all my loyal readers out in cyberspace:
Please change your blog readers and favorites links for my blog to: http://bisongirl.blogspot.com
I'll be back with new projects and creations very soon.

In the next few days, www.bisongirl.com will become the home of my new freelance business – Bison Girl Design. There will be a link from the new site back here to the blog. Please stop in for a visit!

15 February 2010

Onesie dress

DSC_6017
This weekend I made a onesie dress with this tutorial. The tutorial is completely customizable for size and style - super fun. The onesie is completely intact under the skirt, so it will fit nicely without any bunching.

If you think the skirt looks like an old sheet, you're right! This was a test project so I didn't want to "waste" any of my other fabric. As it turns out, I really like it.

More to come!

05 February 2010

Booties for the baby part 2

DSC_5961
I made another pair of booties for the baby. Apparently I was a bit distracted (pregnancy brain anyone?!) and I forgot to use fusible interfacing. All parts of the shoe should have been fused with lightweight interfacing.

The photo above is the uninterfaced pair after washing and drying. The result of not using interfacing is a much softer shoe and the elastic gathers the fabric tighter.

Here is the pair of booties I previously made (with interfacing) ...

DSC_5909
Although both pairs of booties are very soft and look extremely comfy, the interfaced shoes look and feel much sturdier – more like a "shoe" versus a "slipper."

I'm not sure which design I like best. It would certainly help if I had a baby to actually use these shoes so I could decide based on fit. Less than eight weeks and I'll (most likely) have a little product tester of my own :)

30 January 2010

My grandma is a knitting factory

DSC_5957
Yesterday the baby got a very special box from Great Grandma Katy. My Grandma Katy is a knitter and as far as I can tell, has been knitting since she was born – she's super fast! Our baby girl is the proud new owner of three adorable hats, a hooded sweater, and a blanket.

My sister and I were always decked out in Grandma Katy sweaters so it's really special that our baby will have a one from Grandma Katy too.

28 January 2010

Quilts are for cuddling

This blog is in response to the many questions I've received (both as comments to the last post and in real life) regarding why on earth I would hang a quilt on a wall – I assume, as opposed to using it in the crib.

First I must mention that I'm a very firm believer that quilts are for cuddling. That's why all the quilts I've ever made are completely machine washable, and plenty large enough for cuddling (except for this one).

But ... baby quilts are a whole different story. From what I've read, babies should not sleep with blankets, pillows, crib bumpers, or quilts due to an increased risk of SIDS (due to suffocation). As the paranoid first-timer that I am, I'm definitely going to follow the "no blanket in the crib" recommendation. So using it in the crib is out.

I could use the quilt as a play mat ... but I already made one of those. And since I've been a quilter for about 14 years, we have plenty of other quilts in the house to use for play mats.

I hope to take the quilt off the wall and let our baby use it when she gets a bit older (and can use the quilt as a quilt). But until then, I think it makes for some nice wall art.

24 January 2010

Finally up

The nursery quilt is finally quilted. And I got the binding sewn on. And it's washed and crinkly.

DSC_5943

I secured it to the wall (just used a few small nails).

Not that that isn't exciting enough, but after I got the quilt up, I could (finally) get the flag pennant garland up.

DSC_5946
I love it.

DSC_5951
If I could fit in the crib, I think I'd sleep in it.

Hmmm ... now what can I make?

---

P.S. Go Vikings!

23 January 2010

Custom cradle sheets

When I was born, my great grandpa made me this cradle. Aside from how beautiful it is, it holds so many special memories. Thanks to my parents for taking such good care of it all these years, so that our baby will also be able to use it.

It's completely original, which is super cool. The downside is that it's impossible to buy a mattress or sheets for it. Good thing I know a thing or two about sewing.

The "mattress" is two-inch thick, dense foam (from the fabric store). I covered the foam with a lightweight white vinyl table cloth for easy clean up.

DSC_5937
Then come the sheets.

I combined a few online tutorials for making custom fitted sheets. For the fabric, I used old sheets that we no longer used - they are amazingly soft! I made two in white and two in dark pink/red.

DSC_5939
I've heard that it's a good idea to place a giant burp rag-like layer under the sheet to contain any mess. I made two of these by layering one layer of batting between two sheets. For as unglamorous as these are, they sure are cute (and very soft).

21 January 2010

Knotted baby caps

DSC_5891
These knotted baby hats have got to be one of the fastest things to sew - the only downside is that they require cotton knit fabric, which is very different from my stash of quilt fabric (cotton knit fabric has a stretch that quilt fabric does not have). The stretch makes the caps more comfy and snug on the baby's noggin.

I had a hard time finding a pattern or tutorial for these, so I'm trying to make my own. Of course, I'll share it when it's done :)

DSC_5935
My favorite cap (so far) is this one with pig-tail double knots.

DSC_5940
They can also be tied together. Neat.

It'd be quite helpful if I had a real baby head to try these on.

...

On another note, if you like sloppy joe sandwiches, I have delicious recipe from my grandma to share.

Bed skirt for the crib

DSC_5927
I made a bed skirt! In looking for crib bedding I didn't find a bed skirt I liked, so I set out to make one. Have you ever shopped for a crib skirt? Besides being very "loud" prints, they don't even touch the floor – what's the point in a bed skirt that doesn't touch the floor?!

Thanks to this tutorial from stardustshoes, I made my own bed skirt. The stardust blog is a great resource for tutorials - I got the baby booties tutorial there too.

DSC_5928
I had to make a few modifications to make it work with a crib (especially one that has it's longest side against a wall, but it was quite easy. If you tackle this project - remember to measure twice and cut once!

18 January 2010

Little Miss Swaddle

Do you remember these books? From what I can tell, most people from my generation (and the generation before - GenX) will remember them.

Corey had a set of the Little Man, Little Miss books when he was young. His mom passed them down to us for our baby. We've been reading them to the baby every-so-often and have found them to be very funny and cute. So far my favorite is Little Miss Sunshine ... but we have many more to go, so that could change.

Anyway, I was shopping at Joann's Fabric Store yesterday and found a brand new cart of fabric fresh from the back room. The bolts were still wrapped in plastic! I spotted the "Mr. Men" and "Little Miss" character fabric and knew I had to have some. Besides, there is something very cool about getting the first cut. Maybe it's a fabric nerd thing?

I'm not normally a character fabric type of gal, but these were just too special to pass up. Joanns had both the pink/girl and blue/boy versions, in flannel, and cotton sheeting. I decided a pink flannel swaddling blanket would be a good project.

I've done a fair amount of research on swaddling and have found that bigger is better (at least 30 inches, square) and thick blankets don't seem to work as well (the baby can get too warm). So I decided on a single-layer 40-inch (approx.) swaddler.

DSC_5924_2

Here's a mini tutorial for this swaddling blanket:
- I wanted a square blanket, without any waste, so I got a piece of fabric cut that matched the width of the fabric. In this case, the fabric was 42 inches wide, so I got 42 inches of fabric cut (roughly 1 and 1/8 yards).
- Cut off the selvage ends.
- Iron all four sides under 1/4 inch.
- Iron under another 1/4 inch, hiding the raw seams, be sure to iron the corners well.
- Sew 1/8 inch from folded edge, around all four sides.
- Wash (with baby-safe detergent) and enjoy.

If you haven't worked with flannel before, they wash up well, so be prepared for an increase in fluffiness and softness (and a bit of shrinking).

17 January 2010

Booties for the baby

DSC_5909
Aren't these the cutest little shoes?!

I made these with fabric scraps! Wow! I love baby projects.

DSC_5912
The shoes have a faux sherpa/faux suede sole (the fabric is called bonded fleece). So the baby's foot rests on the fuzzy sherpa and the suede adds some extra padding to the sole (I covered the suede in purple fabric but you could leave it showing for a bit of traction). They are fully lined and washable.

The shoes are 0-6-month size, so they "should" fit for quite a while.

I will definitely make more! Check out the gallery of booties on Flickr.

---
Note about bonded fleece fabric: It's very hard to find. The pattern recommends getting it at Joann's - but I was told that they discontinued it a few years ago. The name is rather deceiving, so don't bother asking for it at the craft store. Look for faux sherpa (fuzzy white) on one side, with faux suede on the other side. After searching every large chain fabric store in town, I finally found it at a local store. If you are interested in buying some of mine, leave me a comment and let me know. It sure "makes" the shoes.

15 January 2010

Ready to quilt!

DSC_5907

Last night I finished the top of the nursery quilt. I was debating adding a border, but once I hung it on the wall, I decided it was great as-is. I absolutely love this quilt – and not just because it's for the baby!

It coordinates really well with the playmat and the flag garland and ... (I've got more projects in the works).

Time to get quilting ...

10 January 2010

The crib quilt

DSC_5888

This quilt has been a work in progress for longer than I care to mention (ahem ... I fist blogged about it last April). Luckily it now has more significance than I even intended – it will be our baby's first quilt! It will hang above the crib.

All the blocks are done, now I am working on sewing on the white sashing. The finished quilt will be somewhere between 40x40 and 50x50 inches, depending on if I decide to do for a border, or not.

I love how the red/pink blocks remind me of the Strawberry Shortcake (the doll, not the food), and the orange/yellow blocks make me think of baby chickens, and the green/aqua squares ...

I have high hopes for some major progress this week, so stay tuned.

08 January 2010

Dresser and chair makeover

We were very fortunate that we received a few family hand-me-down heirloom pieces for the baby's nursery.

The biggest project was a dresser that originally belonged to Corey's Great Grandmother and was handed-down to Corey's dad, and to Corey and his siblings. It was a simple, nine-drawer dresser, stained with a light finish.

DSC_5579
My mom and I lightly sanded the surface to remove the shiny texture and prepare for painting. If you've ever sanded furniture, you know it is not an "indoor activity" so we took our project to the garage. Because it was so chilly, we huddled around a propane heater. Surprisingly, we were toasty warm even though we could see our breath.

DSC_5582
My mom helped with the painting, I supervised. Here it is after a few coats of white.

DSC_5868
Finished and in the nursery! We spray-painted the knobs green (the knob that was missing in the photo has been found).

DSC_5445
This little chair belonged to Corey. As you can see, it was in need of some TLC.

DSC_5866
My dad came to the rescue with putty, sand paper, and spray paint. I absolutely love our "new" little chair.

Thanks to my parents for all their help and to Corey's parents for the great nursery furniture! I think there is something very special about using family furniture that is already rich in memories and love, and we're very fortunate that we have the chance to cary on the tradition.

03 January 2010

Fabric flag pennant garland

DSC_5876
This fabric flag pennant banner will hang high above the baby's crib ... kind of like a mobile. I made the banner the "fast easy" way – with top-stitching and store-bought bias tape. It's also a great way to use up some scraps. Want to make one? I'll show you how!

For those wondering about safety – the banner will be very well secured in many spots, so even if one hook should fail, it will not fall on the baby.

DSC_5884
I made my own flag template with an 8.5x11-inch piece of paper (shown above). Cut it out on the solid lines.

Cut two from each of your selected fabrics (one for the front and one for the back). I used my rotary cutter, which really made the process fast.

Using my template, you'll need roughly four pairs of flags per yard of banner.

Sew (topstitch) each pair of flags together, right sides facing out. Sew 1/4 inch from edge, on the two longest sides (see dashed lines on template).

DSC_5886
Pin and sew the flags about two inches apart, to the binding/bias tape. I left about 10 inches of bias tape on each end of my banner, for easier hanging.

That's it! Easy, hunh?!

I think it'd be fun to make these for birthdays or holidays - words like "Thanksgiving" or "Happy Birthday" could be appliqued to the flags too. Or red and green flags, with "Merry Christmas" ... Oh the possibilities!

Happy sewing